Database Access
Welcome to Unit 3 — Building Real Applications. In this lesson you'll learn how to store and retrieve data using a SQLite database. Databases let your application remember information between sessions, handle large amounts of structured data, and power features like contact lists, inventory systems, and user accounts.
- Understand what script-local variables are and why they're useful
- Open a SQLite database with
revOpenDatabase - Create a table with
revExecuteSQL - Insert records using SQL INSERT statements
- Query records with
revQueryDatabaseand iterate through results - Clean up properly with
revCloseCursorandrevCloseDatabase
🗄️ Overview
HyperXTalk uses the Database library to communicate with databases. It supports SQLite, MySQL, PostgreSQL, and ODBC connections. In this lesson we'll use SQLite — a file-based database that requires no server setup, making it perfect for desktop applications.
The workflow for any database operation in HyperXTalk follows the same pattern:
CREATE TABLE to define a table structure, INSERT INTO to add records, and SELECT to retrieve them.
📌 Script-Local Variables
Before we look at database code, there's an important new concept to understand: script-local variables. You've already seen local variables (exist only while a handler runs) and global variables (exist for the lifetime of the stack). Script-local variables sit in between — they persist for as long as the script's object exists, and are accessible to all handlers within that script, but are invisible to everything else.
You declare them at the top of a script, outside any handler, using the local keyword:
Script-local variable names conventionally start with s (for "script"). This makes it immediately clear when you're reading code that a variable is shared across handlers in the same script.
sDatabaseID, and every other handler in the script can use it without you needing to pass it around as a parameter.
🔌 Connecting to a Database
revOpenDatabase opens a connection to a database and returns a database ID — an integer you use to refer to that connection in all subsequent calls. For SQLite, you pass the path to the database file. If the file doesn't exist yet, SQLite creates it automatically.
specialFolderPath("documents") returns the path to the user's Documents folder — a safe, writable location on all platforms. The database ID is stored in the script-local sDatabaseID so every other handler can use it.
revOpenDatabase returns an integer on success, or an error message string on failure. In production code, always check whether the return value is a number before proceeding — if it isn't, the connection failed and subsequent calls will error.
📋 Creating a Table
Use revExecuteSQL to run any SQL statement that doesn't return rows — CREATE TABLE, INSERT, UPDATE, and DELETE all use this command. You pass it the database ID and the SQL string:
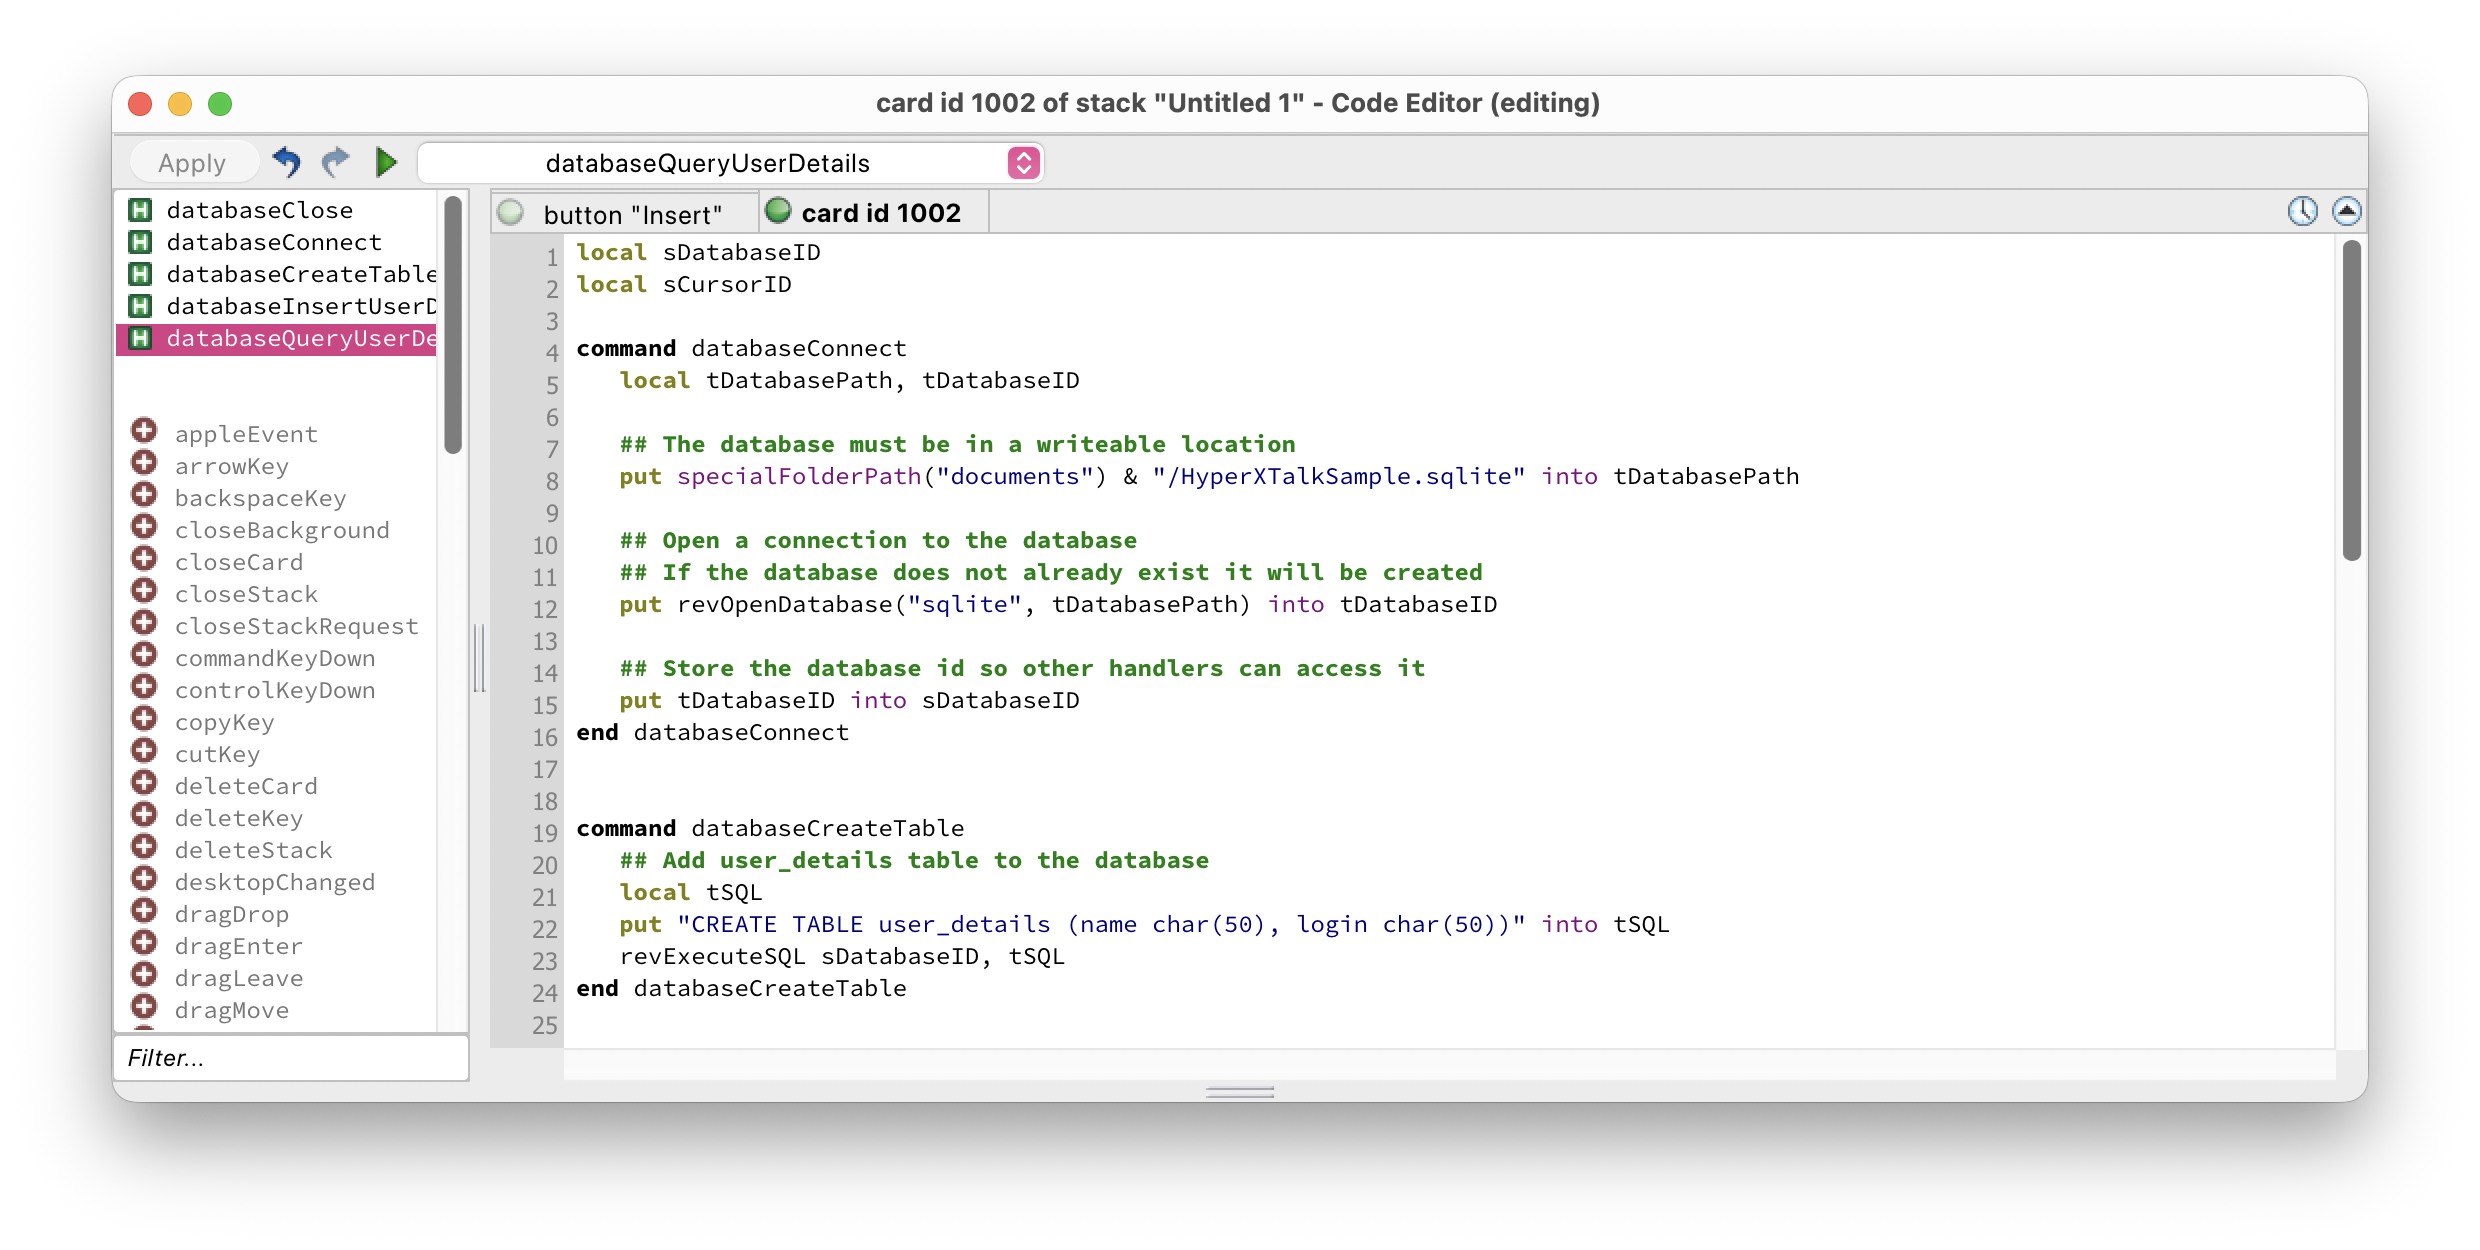
Notice that the SQL string is built in a local variable first. This keeps things readable and makes it easy to build dynamic SQL by putting values into the string before executing it.
➕ Inserting Records
Inserting records also uses revExecuteSQL. You can run multiple SQL statements by appending them to the same string — each statement must end with a semicolon:
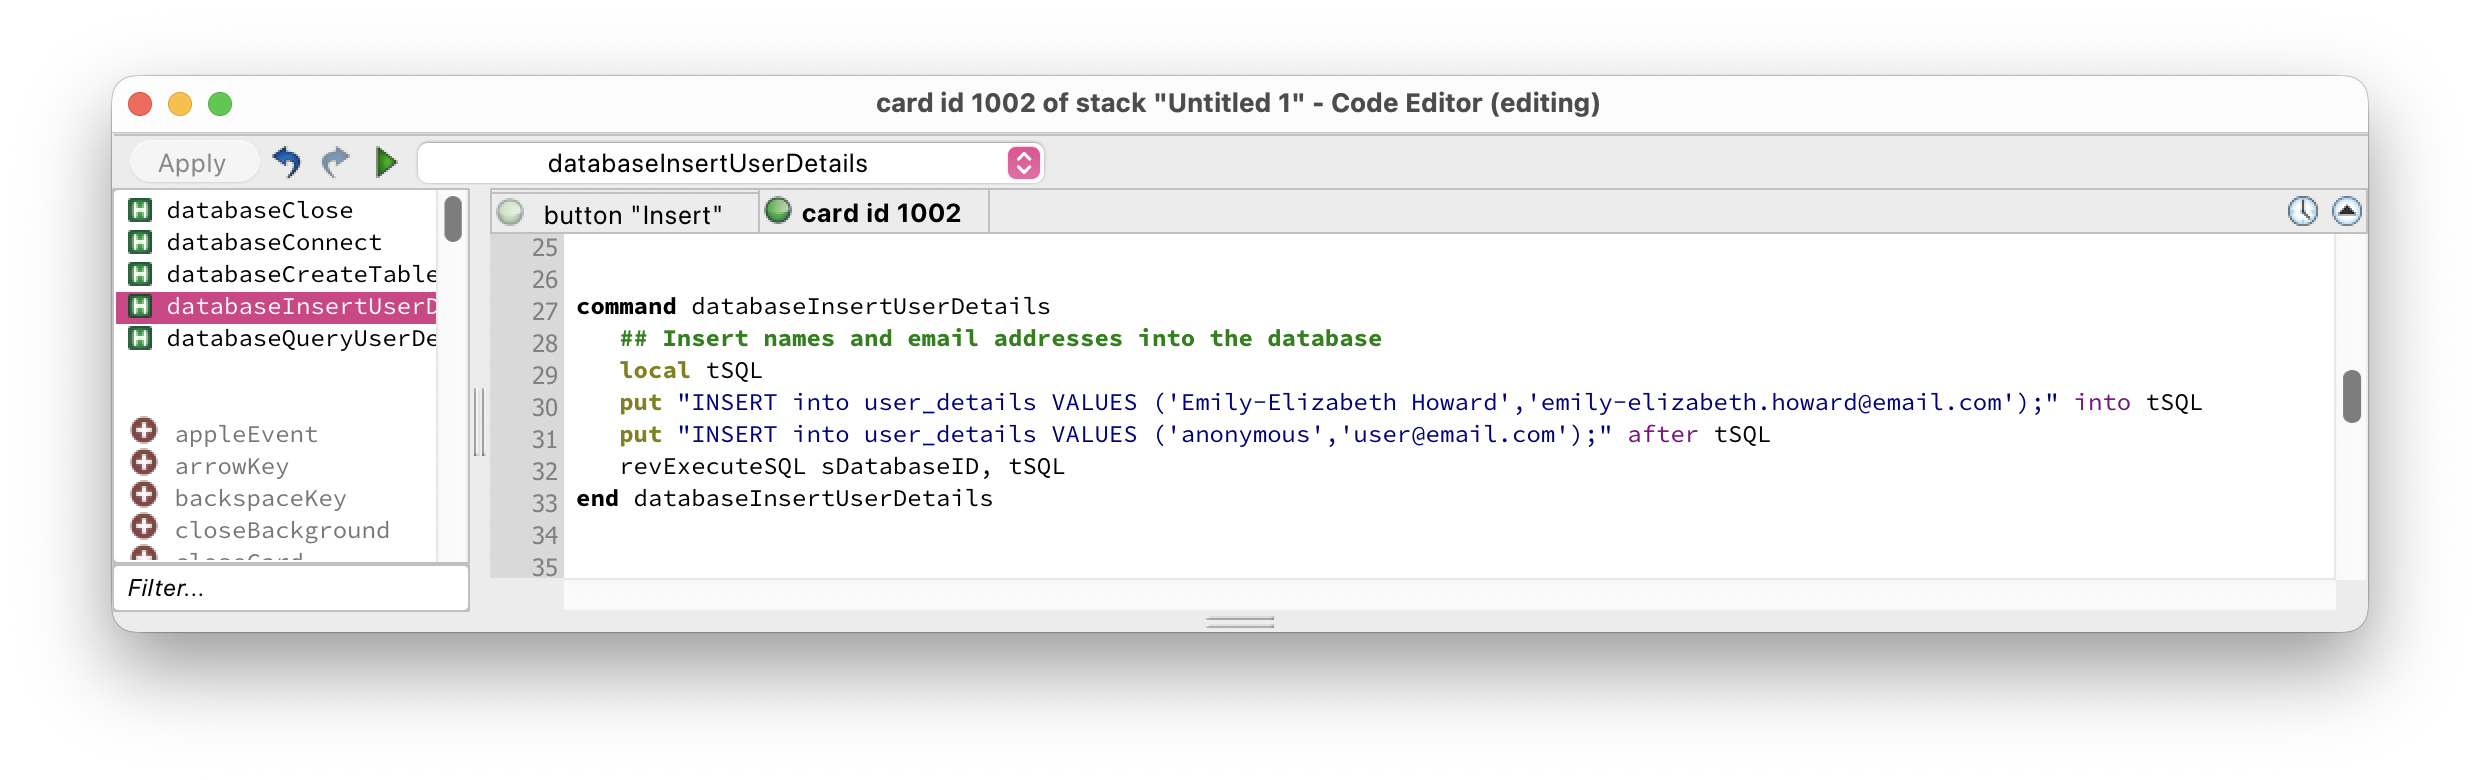
The second INSERT is appended with after tSQL rather than into it, so both statements end up in the string one after the other. A single revExecuteSQL call then executes them both.
🔍 Querying Records
For SELECT queries that return rows, use revQueryDatabase. It returns a cursor ID — an integer pointing to the result set. You then iterate through the rows using revQueryIsAtEnd as the loop condition and revMoveToNextRecord to advance:
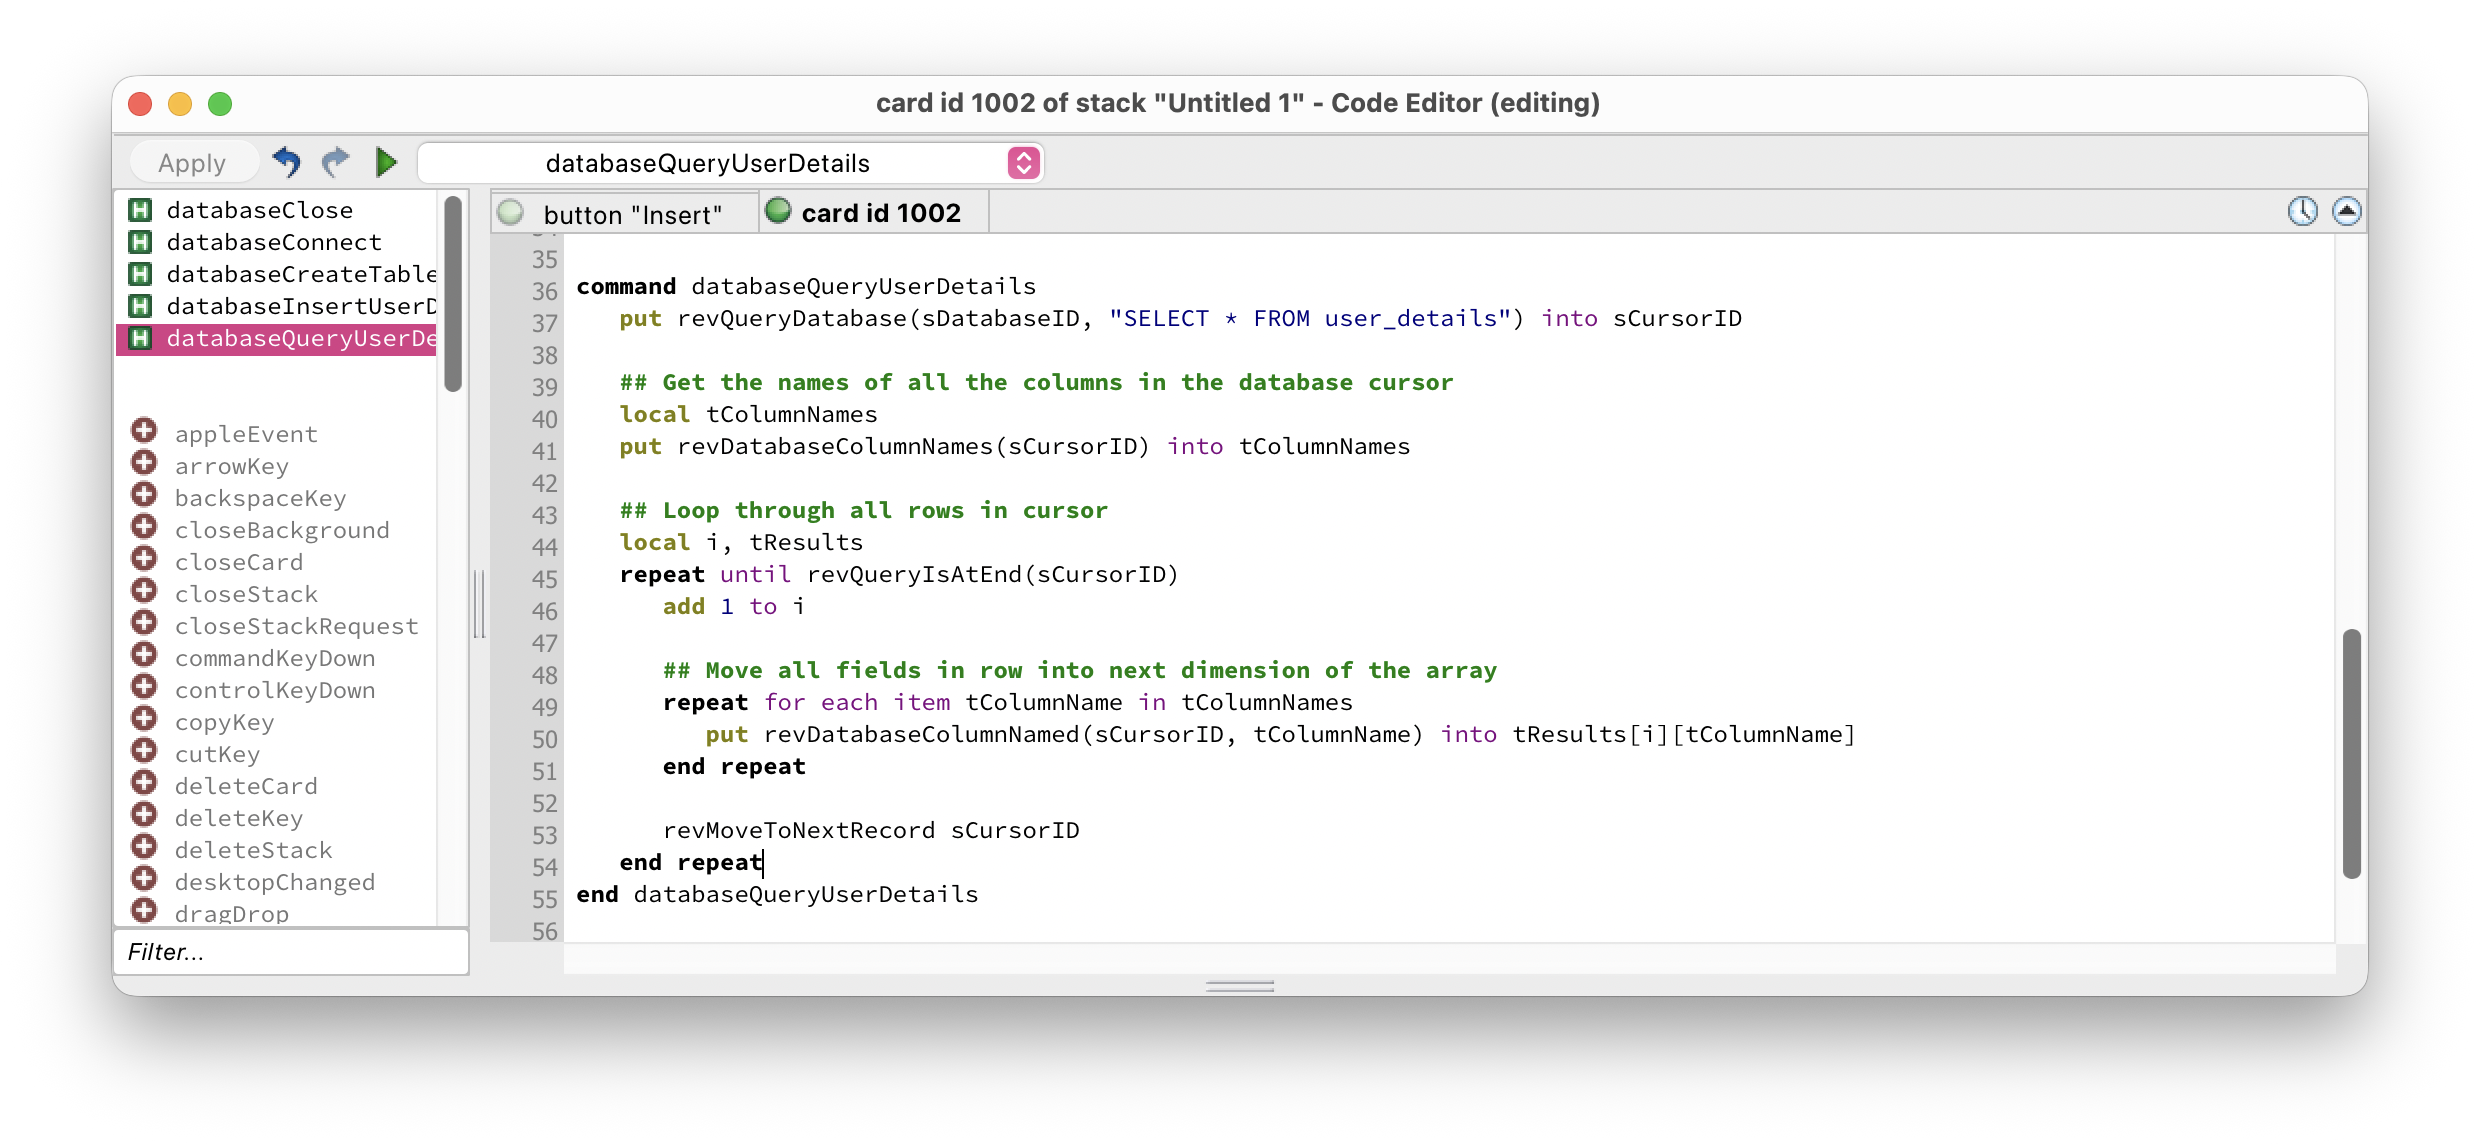
There are several things worth understanding in this pattern:
revDatabaseColumnNames returns a comma-separated list of the column names in the result set. By getting these dynamically rather than hardcoding them, the handler works correctly even if the table structure changes.
repeat until revQueryIsAtEnd(sCursorID) — the loop runs until the cursor has moved past the last row. Note that revMoveToNextRecord is called at the end of the loop body, after reading the current row.
tResults[i][tColumnName] — results are stored in a two-dimensional array, indexed by row number and column name. After the loop, tResults[1]["name"] would contain the name from the first row, tResults[2]["login"] the login from the second, and so on.
🔒 Closing Up
Always close your cursor and database connection when you're done. Leaving connections open wastes resources and can cause problems if the stack is reopened:
Close the cursor before the database — the cursor belongs to the database connection, so closing the database first would leave the cursor in an invalid state.
databaseConnect from an openCard or openStack handler, and databaseClose from closeCard or closeStack. That way the connection lifecycle matches the stack lifecycle automatically.
In this exercise you'll build a simple contact book that stores names and email addresses in a SQLite database. The card script holds all the database handlers; buttons on the card call them.
-
Create a new stack. Add fields named
NameInputandEmailInputfor data entry, a scrolling output field namedResultswith Lock text enabled, and four buttons: Connect, Create Table, Add Contact, and Show All. -
Open the card script (right-click the card background and choose Edit Card Script). At the very top, declare the script-local variables:
local sDatabaseID local sCursorID
-
Add the
databaseConnectanddatabaseCreateTablehandlers to the card script as shown in the lesson above.
Connect & Create Table -
Add an
addContacthandler that reads from the two input fields and inserts a record:command addContact local tName, tEmail, tSQL put the text of field "NameInput" into tName put the text of field "EmailInput" into tEmail put "INSERT INTO user_details VALUES ('" \ & tName & "','" & tEmail & "');" into tSQL revExecuteSQL sDatabaseID, tSQL end addContact
Insert handler -
Add a
showAllContactshandler that queries the database and displays results in the Results field:command showAllContacts put revQueryDatabase(sDatabaseID, "SELECT * FROM user_details") \ into sCursorID local tOutput repeat until revQueryIsAtEnd(sCursorID) put revDatabaseColumnNamed(sCursorID, "name") & " — " \ & revDatabaseColumnNamed(sCursorID, "login") \ & return after tOutput revMoveToNextRecord sCursorID end repeat set the text of field "Results" to tOutput revCloseCursor sCursorID end showAllContacts
Query handler -
Edit each button's script to call the appropriate card handler — e.g. the Connect button should contain:
on mouseUp databaseConnect end mouseUp
- Switch to Browse mode. Click Connect, then Create Table, then type a name and email and click Add Contact. Click Show All to see your contacts appear in the Results field.
Bonus challenge: Add a Clear All button that runs DELETE FROM user_details via revExecuteSQL to wipe the table, then refreshes the Results field.
revOpenDatabase return on success, and how can you tell if it failed?if the result is not a number then to detect failure.revQueryDatabase(databaseID, sqlQuery) — it returns a cursor ID (an integer) pointing to the result set. You then use revQueryIsAtEnd, revDatabaseColumnNamed, and revMoveToNextRecord to iterate through the rows.revCloseCursor, then the database with revCloseDatabase. The cursor belongs to the database connection, so closing the database first would leave the cursor in an invalid state.revDatabaseColumnNames return, and why is it useful?repeat for each item loop means your query handler works correctly regardless of how many columns the table has or what they're called — you don't need to hardcode column names.